Single Sign-On for Kerberos
This guide will discuss how to set up single sign-on using Microsoft Active Directory.
Note
SSO can only be configured on self-hosted installations.
Conceptual Overview
Like every other web application out there, Zammad has its own logic for signing users up, storing their passwords, authenticating them, and managing their sessions.
If your IT department keeps its own user identity store (like Active Directory), Zammad’s SSO support allows you to leverage that existing auth system so that anyone with an account on your local intranet will 1) automatically have an account in Zammad and 2) be able to log in with a single click.
Note
If you don’t have this IT infrastructure but still want one-click login, see Third Party Authentication for alternatives.
How Does it Work?
Once enabled, single sign-on activates an endpoint
at https://your.zammad.host/auth/sso.
When the Zammad server receives a GET request at this endpoint
with a valid username in any one of the following:
an
X-Forwarded-Userrequest headera
REMOTE_USERweb server environment variablean
HTTP_REMOTE_USERweb server environment variable
it creates a new session for that user.
Note
😬 Wait. SSO allows you to sign in with only a username?
In principle, yes.
How is that okay?
In this guide, we configure our web server (Apache)
to intercept all requests to the /auth/sso endpoint.
Instead of forwarding them to Zammad,
Apache initiates a three-sided login process (Kerberos authentication)
between the itself, the user, and the Active Directory server.
If Active Directory doesn’t recognize the user or their password, Zammad never sees the request, and the session is never created.
What does this all mean?
It means there are many ways you could set up SSO—you don’t need to follow this guide or even use Active Directory or Kerberos—but if you don’t know what you’re doing, you’re going to end up with a massive security hole.
Getting Started
Hint
😵 Too busy to handle it on your own?
We’ve got you covered. Our experts offer custom-tailored workshops to get your team up and running fast and with confidence. Just drop us a line!
You will need:
a Microsoft Active Directory environment with
root access
support for AES 256-bit encryption
a Zammad host with
root access
a fully-qualified domain name (FQDN)
some familiarity with system administration (e.g., Apache configuration)
For best results, set up LDAP integration to make sure your Active Directory and Zammad user accounts are always in sync.
Step 1: Configure Active Directory
In the Kerberos authentication scheme, the authentication server (Active Directory) needs to maintain shared secrets with the service (Zammad). To make this possible, we need to register a service principal name (SPN) for Zammad on Active Directory.
Note
These directions have been confirmed on Windows Server 2016.
1a. Create a service account
You may use an existing service account if you have one. Admin privileges are not required; a normal user account will do.
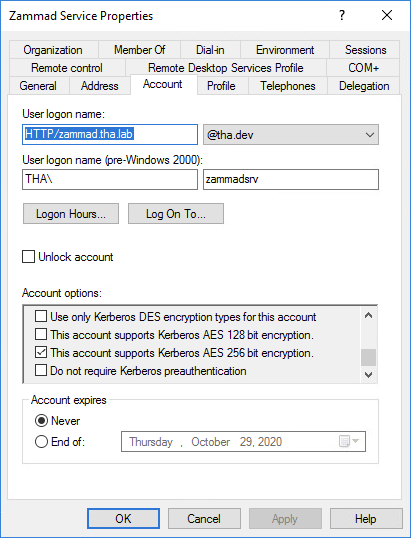
Select “This account supports Kerberos AES 256 bit encryption” under Properties > Account > Account options.
1b. Reset Password
Reset service account password after enabling the “This account supports Kerberos AES 256 bit encryption”.
1c. Register a SPN for Zammad
Replace the following placeholders in the command below:
<zammad-host>Zammad FQDN
<service-acct>Service account logon name
<password>Password of the service account (Option
/pass *did prove to not work)<domain>Windows domain
<master-domain-controller>Master domain controller IP/FQD
Below command will prompt for the users password:
$ setspn -s HTTP/<zammad-host> <service-acct>
$ ktpass /princ HTTP/<zammad-host>@<DOMAIN> \
         /mapuser <service-acct> \
         /crypto AES256-SHA1 \
         /ptype KRB5_NT_PRINCIPAL \
         /pass <password> -SetPass +DumpSalt \
         /target <master-domain-controller> \
         /out zammad.keytab
1d. Note the secret key and version number
The output of the command above contains important data for Step 2e below:
Using legacy password setting method
Failed to set property 'servicePrincipalName' to 'HTTP/<zammad-host>' on Dn 'CN=Zammad Service,DC=<domain>,DC=<tld>': 0x13.
WARNING: Unable to set SPN mapping data.
If <service-acct> already has an SPN mapping installed for HTTP/<zammad-host>, this is no cause for concern.
Building salt with principalname HTTP/<zammad-host> and domain <domain> (encryption type 18)...
Hashing password with salt "<domain><service-acct>".
Key created.
Output keytab to zammad.keytab:
Keytab version: 0x502
keysize 67 <service-acct>@<domain> ptype 1 (KRB5_NT_PRINCIPAL) vno 3 etype 0x12 (AES256-SHA1) keylength 32 (0x5ee827c30c736dd4095c9cbe146eabc216415b1ddb134db6aabd61be8fdf7fb1)
On the last line, take note of:
- the secret key
in parentheses at the end (0x5ee827…)
- the secret key version number
preceded by
vno(3)
Step 2: Remove NGINX, Set up Apache + Kerberos
Next, the Zammad host must be configured to support Kerberos (and to accept auth credentials provided by the Active Directory server).
In most cases, you would have to recompile NGINX from source with an extra module to enable Kerberos support. To get around this, we will use Apache, which offers Kerberos support through a plug-in module instead.
Note
All commands in this section must be run as root (or with sudo).
2a. Turn Off NGINX
Warning
This will take your Zammad instance offline until Apache is fully configured and running.
Turn off Nginx:
$ sudo systemctl stop nginx
Keep it off after reboot:
$ sudo systemctl disable nginx
If you wish to minimize downtime, you can save this step for last; just bear in mind that Apache will not start if the port it wants to listen on is being used by NGINX.
If for any reason you can’t complete this tutorial, simply turn off Apache and restore NGINX:
$ sudo systemctl stop apache2
$ sudo systemctl disable apache2
$ sudo systemctl enable nginx
$ sudo systemctl start nginx
2b. Pre-Configure Apache
This documentation expects a already working Apache configuration. Please see Configure the Webserver before continuing.
2c. Install Further Apache Dependencies
$ sudo apt update
$ sudo apt install krb5-user libapache2-mod-auth-gssapi
$ sudo dnf install krb5-workstation mod_auth_kerb
$ sudo zypper ref
$ sudo zypper install krb5-client apache2-mod_auth_kerb
2d. Enable Apache Modules
SSO requires modules that are not enabled by default. By default you can use
a2enmod to do so.
$ a2enmod auth_gssapi rewrite
$ sudo systemctl restart apache2
$ a2enmod auth_kerb rewrite
$ systemctl restart apache2
add/uncomment the appropriate LoadModule statements
in your Apache config:
# /etc/httpd/conf/httpd.conf

LoadModule auth_kerb_module /usr/lib/apache2/modules/mod_auth_kerb.so
LoadModule rewrite_module modules/mod_rewrite.so
2e. Configure Kerberos
Kerberos realm configuration is how you tell the Zammad server how to reach the domain controller (Active Directory server).
Replace the following placeholders in the sample config below:
<domain>Windows domain
<domain-controller>Domain controller IP/FQDN(s)
<master-domain-controller>Master domain controller IP/FQDN
(must not be read-only, but can be the same as
<domain-controller>)
# /etc/krb5.conf

[libdefaults]
   default_realm = <DOMAIN>

   default_tkt_enctypes = aes256-cts-hmac-sha1-96
   default_tgs_enctypes = aes256-cts-hmac-sha1-96
   permitted_enctypes = aes256-cts-hmac-sha1-96

   kdc_timesync = 1
   ccache_type = 4
   forwardable = false
   proxiable = false
   fcc-mit-ticketflags = false

[realms]
         # multiple KDCs ok (one `kdc = ...` definition per line)
         <DOMAIN> = {
                  kdc = <domain-controller>
                  admin_server = <master-domain-controller>
                  default_domain = <domain>

                  # below is only for GSSAPI
                  auth_to_local = RULE:[1:$1@$0](.*@<domain>)s/@<domain>$//
                  auth_to_local = DEFAULT
         }

[domain_realm]
         .<domain> = <DOMAIN>
         <domain> = <DOMAIN>
2f. Generate Keytab
Apache needs a Kerberos keytab (key table) to manage its shared secrets with the domain controller.
Replace the following placeholders in the commands below:
<zammad-host>Zammad FQDN
<domain>Windows domain
<secret-key>Secret key (omit the leading
0x)<vno>Secret key version number
The secret key and version number were found in Step 1: Configure Active Directory above.
$ ktutil

ktutil: addent -key -p HTTP/<zammad-host>@<DOMAIN> -k <vno> -e aes256-cts
Key for HTTP/<zammad-host>@<domain> (hex): <secret-key>

ktutil: list  # confirm the entry was added successfully
slot KVNO Principal
---- ---- ---------------------------------------------------------------
   1    3 HTTP/<zammad-host>@<DOMAIN>

ktutil: wkt /root/zammad.keytab  # write keytab to disk

ktutil: quit
Then, place the keytab in the Apache config directory and set the appropriate permissions:
$ sudo mv /root/zammad.keytab /etc/apache2/
$ sudo chown root:www-data /etc/apache2/zammad.keytab
$ sudo chmod 640 /etc/apache2/zammad.keytab
$ sudo mv /root/zammad.keytab /etc/httpd/
$ sudo chown root:apache /etc/httpd/zammad.keytab
$ sudo chmod 640 /etc/httpd/zammad.keytab
2g. Configure Apache
Add the following directive to the end of the virtual host configuration file
to create your Kerberos SSO endpoint at /auth/sso:
Replace the following placeholders in the command below:
<zammad-host>Zammad FQDN
<domain>Windows domain
The configuration for CentOS and OpenSUSE below contains two Krb5KeyTab
lines! Keep only the one you need.
# /etc/apache2/sites-available/zammad.conf

<LocationMatch "/auth/sso">
   SSLRequireSSL
   AuthType GSSAPI
   AuthName "Your Zammad"
   GssapiBasicAuth On
   GssapiCredStore keytab:/etc/apache2/zammad.keytab
   GssapiLocalName On
   require valid-user

   RewriteEngine On
   RewriteCond %{LA-U:REMOTE_USER} (.+)
   RewriteRule . - [E=RU:%1,NS]
   RequestHeader set X-Forwarded-User "%{RU}e" env=RU
</LocationMatch>
# /etc/apache2/sites-available/zammad.conf

<LocationMatch "/auth/sso">
   SSLRequireSSL
   AuthType Kerberos
   AuthName "Your Zammad"
   KrbMethodNegotiate On
   KrbVerifyKDC On
   KrbMethodK5Passwd On
   KrbAuthRealms <DOMAIN>
   KrbLocalUserMapping on                 # strips @REALM suffix from REMOTE_USER variable
   KrbServiceName HTTP/<zammad-host>@<DOMAIN>
   Krb5KeyTab /etc/apache2/zammad.keytab  # Ubuntu, Debian, & openSUSE
   Krb5KeyTab /etc/httpd/zammad.keytab    # CentOS
   require valid-user

   RewriteEngine On
   RewriteCond %{LA-U:REMOTE_USER} (.+)
   RewriteRule . - [E=RU:%1,NS]
   RequestHeader set X-Forwarded-User "%{RU}e" env=RU
</LocationMatch>
2g. Restart Apache to Apply Changes
$ sudo systemctl restart apache2
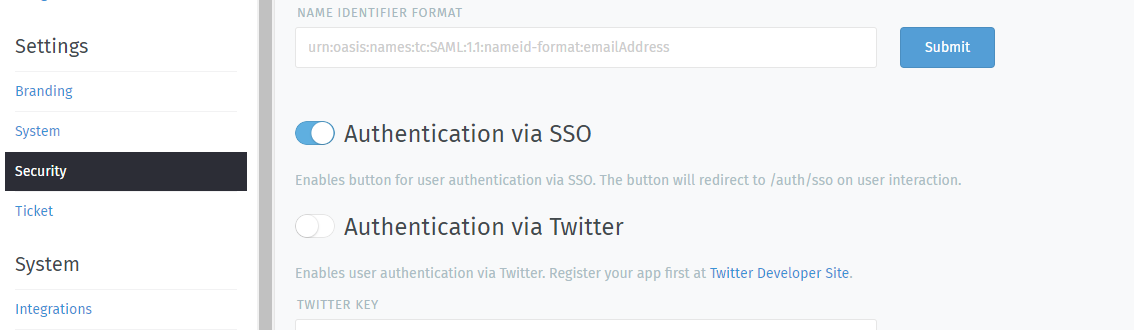
Step 3: Enable SSO in Zammad
Next, enable “Authentication via SSO” in Zammad’s admin settings under Settings > Security > Third-party Applications. Make sure to configure the trusted SSO proxy IPs for production systems.
Step 4: Configure Client System (Windows Only)
For the full SSO experience (i.e., for passwordless, one-click sign-in), Zammad users must:
be on the Active Directory server’s local intranet; and
modify their network settings for the Zammad host to be treated as a local intranet server.
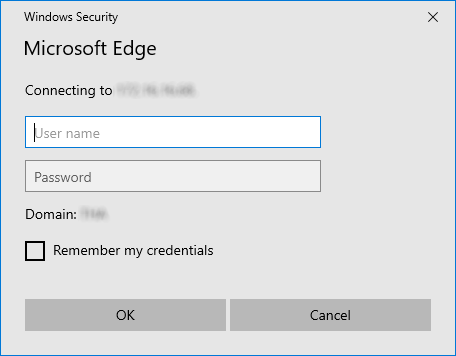
Without this step, users must enter their Active Directory credentials during SSO.
Tip
This setting can be centrally managed across the entire intranet using a group policy object (GPO).
Add your Zammad FQDN in Internet Options under Security > Local Intranet > Sites > Advanced.
Select “Require server verification (https:) for all sites in this zone”.
Under Security level for this zone > Custom level… > Settings > User Authentication > Logon, select “Automatic logon only in Intranet Zone”.
Note
This option cannot be centrally managed because it is set in the browser rather than Windows Settings.
Enter
about:configin the address bar. Click Accept the risk and continue.Search for the
network.negotiate-auth.trusted-urisoption.Double-click to edit, then add your Zammad FQDN.
Restart Firefox to apply your changes.
Troubleshooting
Are all relevant FQDNs/hostnames reachable from your Active Directory and Zammad servers (including each other’s)?
Are the system clocks of your Active Directory and Zammad servers synchronized within five minutes of each other? (Kerberos is a time-sensitive protocol.)
Errors in Apache Logs
Tip
Try raising your Apache log level temporarily.
Add LogLevel debug to your virtual host configuration,
then restart the service to apply the changes.
- “an unsupported mechanism was requested”
Does your Active Directory service account have Kerberos AES 256-bit encryption enabled?
If for some reason your server does not support AES 256-bit encryption, the LDAP Wiki has more information about Kerberos encryption types.
- “failed to verify krb5 credentials: Key version is not available”
Did you use the exact version number (
vno) provided byktpasswhen generating your keytab?Try generating it again, just to be sure.
- “unspecified GSS failure. Minor code may provide more information (, No key table entry found for HTTP/FQDN@DOMAIN)”
Does the service name you provided to
setspnexactly match the one you used when generating your keytab?Try generating it again, just to be sure.
- “No key table entry found for HTTP/FQDN@DOMAIN”
Does your virtual host configuration’s
KrbServiceNamesetting exactly match the service name you provided tosetspn?This setting is case-sensitive.
- “Warning: received token seems to be NTLM, which isn’t supported by the Kerberos module. Check your IE configuration”
Is your Zammad host accessible at an FQDN? This error may indicate that you configured your Zammad host as a numeric IP address instead.
- “Cannot decrypt ticket for HTTP/FQDN@DOMAIN”
Did you make sure to change the password on your Active Directory service account after enabling 256-bit AES encryption?
And did you make sure to register the SPN (with
ktpass) and generate your keytab (withktutil) after changing your password?Try running
kinit -k -t <path to keytab> HTTP/<zammad-host>@<DOMAIN>. If no output is returned, you’re good - if you see “kinit: Preauthentication failed while getting initial credentials” your credentials provided were wrong or you used/pass *during ktpass command.- “failed when verifying KDC” and “failed to verify krb5 credentials: Decrypt integrity check failed”
Ensure
KrbServiceNameis the correct ServiceName provided via setspn.Ensure your Active Directory supports the encryption method configured.
If all above is correct and the rest of FAQ also is ensured, make sure your client does not cache the results.
klist purgeclears the clients cache - a reboot of your client would do too.